- LinearLayout과 FrameLayout 으로 CustomTab을 만드는 간단한 예제이다.
- Framelayout으로 같은 화면에 겹쳐 나오는 방법을 사용해 여러 view를 사용하고 있다는 느낌을 받을수 있다.
- 일반적인 Tab을 사용하면 화면 상단배치가 되는데, CustomTab 방식을 이용해 화면 하단배치해 사용자를 배려한다.
-Java 소스
-xml 소스
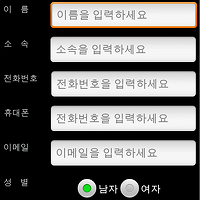
-실행 화면

- Framelayout으로 같은 화면에 겹쳐 나오는 방법을 사용해 여러 view를 사용하고 있다는 느낌을 받을수 있다.
- 일반적인 Tab을 사용하면 화면 상단배치가 되는데, CustomTab 방식을 이용해 화면 하단배치해 사용자를 배려한다.
-Java 소스
public class Ex05_CustomTabActivity extends Activity implements OnClickListener {
/** Called when the activity is first created. */
@Override
public void onCreate(Bundle savedInstanceState) {
super.onCreate(savedInstanceState);
setContentView(R.layout.main);
Button b1=(Button)this.findViewById(R.id.button1);
b1.setOnClickListener(this);
Button b2=(Button)this.findViewById(R.id.button2);
b2.setOnClickListener(this);
Button b3=(Button)this.findViewById(R.id.button3);
b3.setOnClickListener(this);
}
public void onClick(View arg0) {
// TODO Auto-generated method stub
LinearLayout a1 = (LinearLayout)this.findViewById(R.id.number1);
a1.setVisibility(View.INVISIBLE);
LinearLayout a2 = (LinearLayout)this.findViewById(R.id.number2);
a2.setVisibility(View.INVISIBLE);
LinearLayout a3 = (LinearLayout)this.findViewById(R.id.number3);
a3.setVisibility(View.INVISIBLE);
switch(arg0.getId()){
case R.id.button1:
a1.setVisibility(View.VISIBLE);
break;
case R.id.button2:
a2.setVisibility(View.VISIBLE);
break;
case R.id.button3:
a3.setVisibility(View.VISIBLE);
break;
}
}
} -xml 소스
<?xml version="1.0" encoding="utf-8"?>
<LinearLayout xmlns:android="http://schemas.android.com/apk/res/android"
android:layout_width="fill_parent"
android:layout_height="fill_parent"
android:orientation="vertical" >
<FrameLayout
android:layout_width="fill_parent"
android:layout_height="wrap_content"
android:layout_weight="1"
android:orientation="vertical" >
<LinearLayout
android:id="@+id/number1"
android:layout_width="fill_parent"
android:layout_height="fill_parent"
android:orientation="vertical"
android:visibility="visible" >
<TextView
android:layout_width="fill_parent"
android:layout_height="fill_parent"
android:text="이거원 인터넷이안되니!!" />
</LinearLayout>
<LinearLayout
android:id="@+id/number2"
android:layout_width="fill_parent"
android:layout_height="fill_parent"
android:orientation="vertical"
android:visibility="invisible" >
<TextView
android:layout_width="fill_parent"
android:layout_height="fill_parent"
android:text="정말정말정말!!" />
</LinearLayout>
<LinearLayout
android:id="@+id/number3"
android:layout_width="fill_parent"
android:layout_height="fill_parent"
android:orientation="vertical"
android:visibility="invisible" >
<TextView
android:layout_width="fill_parent"
android:layout_height="fill_parent"
android:text="불편해서 죽겠네" />
</LinearLayout>
</FrameLayout>
<LinearLayout
android:layout_width="fill_parent"
android:layout_height="wrap_content"
android:layout_weight="0"
android:background="#ccccff"
android:gravity="center"
android:orientation="horizontal" >
<Button
android:id="@+id/button1"
android:layout_width="wrap_content"
android:layout_height="fill_parent"
android:layout_weight="1"
android:text="테이블1" />
<Button
android:id="@+id/button2"
android:layout_width="wrap_content"
android:layout_height="fill_parent"
android:layout_weight="1"
android:text="테이블2" />
<Button
android:id="@+id/button3"
android:layout_width="wrap_content"
android:layout_height="fill_parent"
android:layout_weight="1"
android:text="테이블3" />
</LinearLayout>
</LinearLayout> -실행 화면
'JAVA > Android' 카테고리의 다른 글
| 안드로이드 Intent 예제 따라하기 (0) | 2012.01.04 |
|---|---|
| 안드로이드 Calulator(계산기) 예제 따라하기 (0) | 2012.01.03 |
| 안드로이드 전화번호부 연락처 추가 만들기 예제 (3) | 2012.01.02 |
| 안드로이드 RelativeLayout 예제 따라하기 (0) | 2012.01.02 |
| 안드로이드 RadioGroup 예제 따라하기 (0) | 2011.12.29 |